Blockchain wallets have a problem. In a few short years, they have gone from being a simple tool to allow you to access easily your assets to becoming a massive friction point for a smoother on-chain experience for users and developers alike.
As wallets become more ecosystem-specific and niche, users navigating multiple ecosystems need to install and switch between multiple wallets, and developers looking to onboard users from multiple chains need to spend time and resources supporting multiple wallet types.
The Problem With Wallets
You see, the wallet’s original purpose is twofold:
- be a place to store and manage your accounts and keys
- be an interface for users to use their keys to interact with the blockchain
However, as the wallet landscape and blockchain ecosystem have grown, these same wallets have started to become a bottleneck and a friction point. Similar to how the blockchains themselves have fragmented, so have the surrounding tools, including wallets.
Exploring Fragmentation
The problem itself is simple. We as an industry have normalized the idea of having a new wallet for each new ecosystem or tech stack. While there are definitely good reasons for this, such as offering a tailored user experience or adding and supporting chain-specific features, a significant part is also self-imposed limitations.
See, wallets have gone from being simple key management tools to full-fledged applications on their own, with features such as asset and portfolio management, swapping tokens, staking, and more. Understandably, part of this is the consequences of wallets trying and needing to differentiate themselves.
Again this is not necessarily bad! But most of these extra features differs among chains. How you send transactions and queries user balances changes significantly between say EVM, Solana, and Cosmos, not to mention more niche chains. Supporting these features for all ecosystems in a single wallet then becomes an undertaking of brobdingnagian proportions, if at all feasible. This leads to most wallets being highly specialized to a single ecosystem or a small set of chains. Users wanting to interact with multiple chains need to find, install, and switch between numerous wallet options.
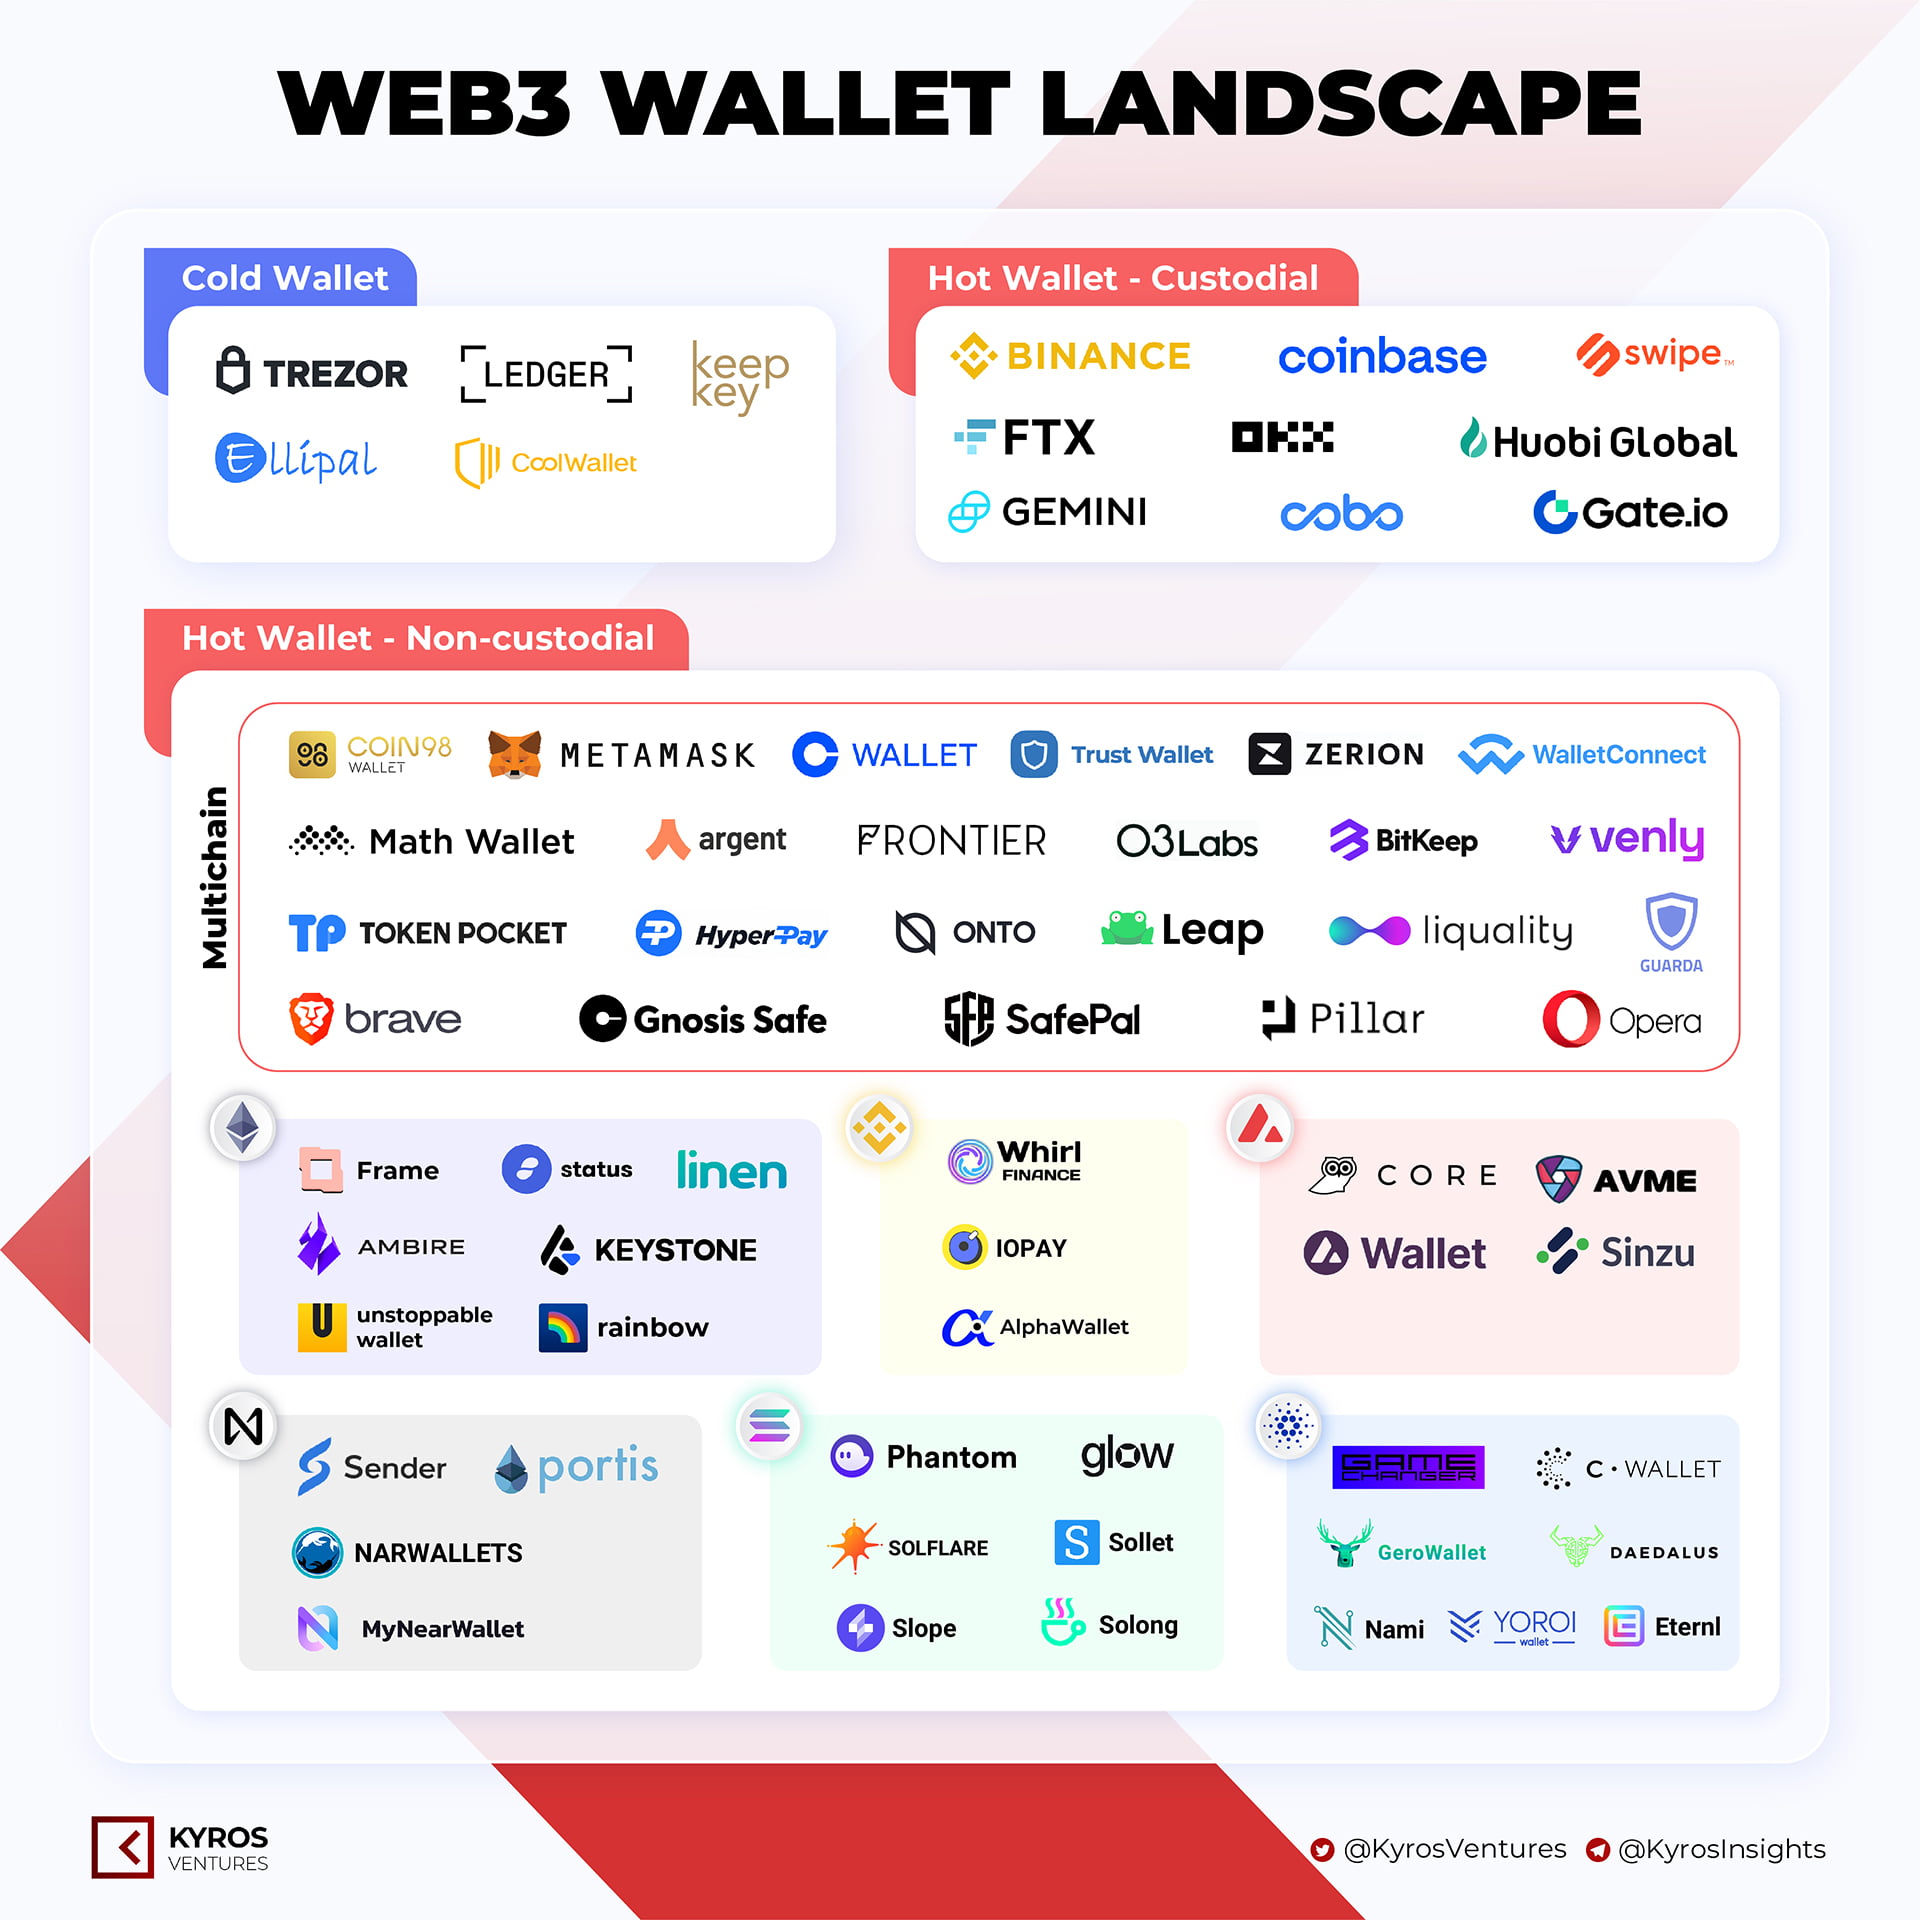
Your previously universal private keys are now restricted, imposed, and locked down by its own container. This clearly results in a suboptimal UX. But further than that, the need for multiple wallets also creates additional risks for the user. They need to worry about clicking on the correct wallet extension link, inputting the private key securely, and more.
All this needs to change. And, with Initia, we have the chance to do just that. Our approach to doing so is simple; “keys, not wallets.” In short:
- wallets as key managers: treat wallets as what they originally meant to be, as signing devices
- make wallets universal (again): allow users to use their existing wallets to interact with Initia
To achieve this, we’ve designed the Initia Wallet Widget.
Initia Wallet Widget
Goals and Features
At its core, the key functions of the Wallet Widget are simple:
- Act as an intermediary between a dApp and the user’s wallet, allowing users and apps to utilize wallets they already have
- Offload all the conventional functionality and complexity of signing and broadcasting transactions from the wallet to the Widget
This approach offers several benefits:
- Simplifies dApp development by abstracting wallet interactions
- Provides a consistent user experience across different wallets
- Enhances security by reducing the need for users to manage multiple wallets
Instead of having wallets directly interact with a dApp, the Wallet Widget acts as an intermediary layer between them. This means each app doesn’t have to implement and support every major wallet or perform the necessary conversion for different wallets, VMs, signatures, and transaction types. All of this is instead abstracted away and handled by the Widget. The application can then solely focus on what’s most important: building out core functionalities and experiences for the user, with the rest handled for them.
On the user side, the Wallet Widget allows users to interact with all applications on Initia with the wallet that they already use. No going to the Chrome Store and installing a new wallet, no security risks of re-importing private keys, no cluttered and overloaded browser sidebars. The same wallet you already have, but for an entirely new ecosystem of apps. Let’s explore how this works in more detail.
Painting a Picture
Let’s say you’re a user with an existing wallet who wants to interact with the Initia App.
When you first click on “Connect Wallet,” a modal window prompts you to choose which wallet you want to connect with.
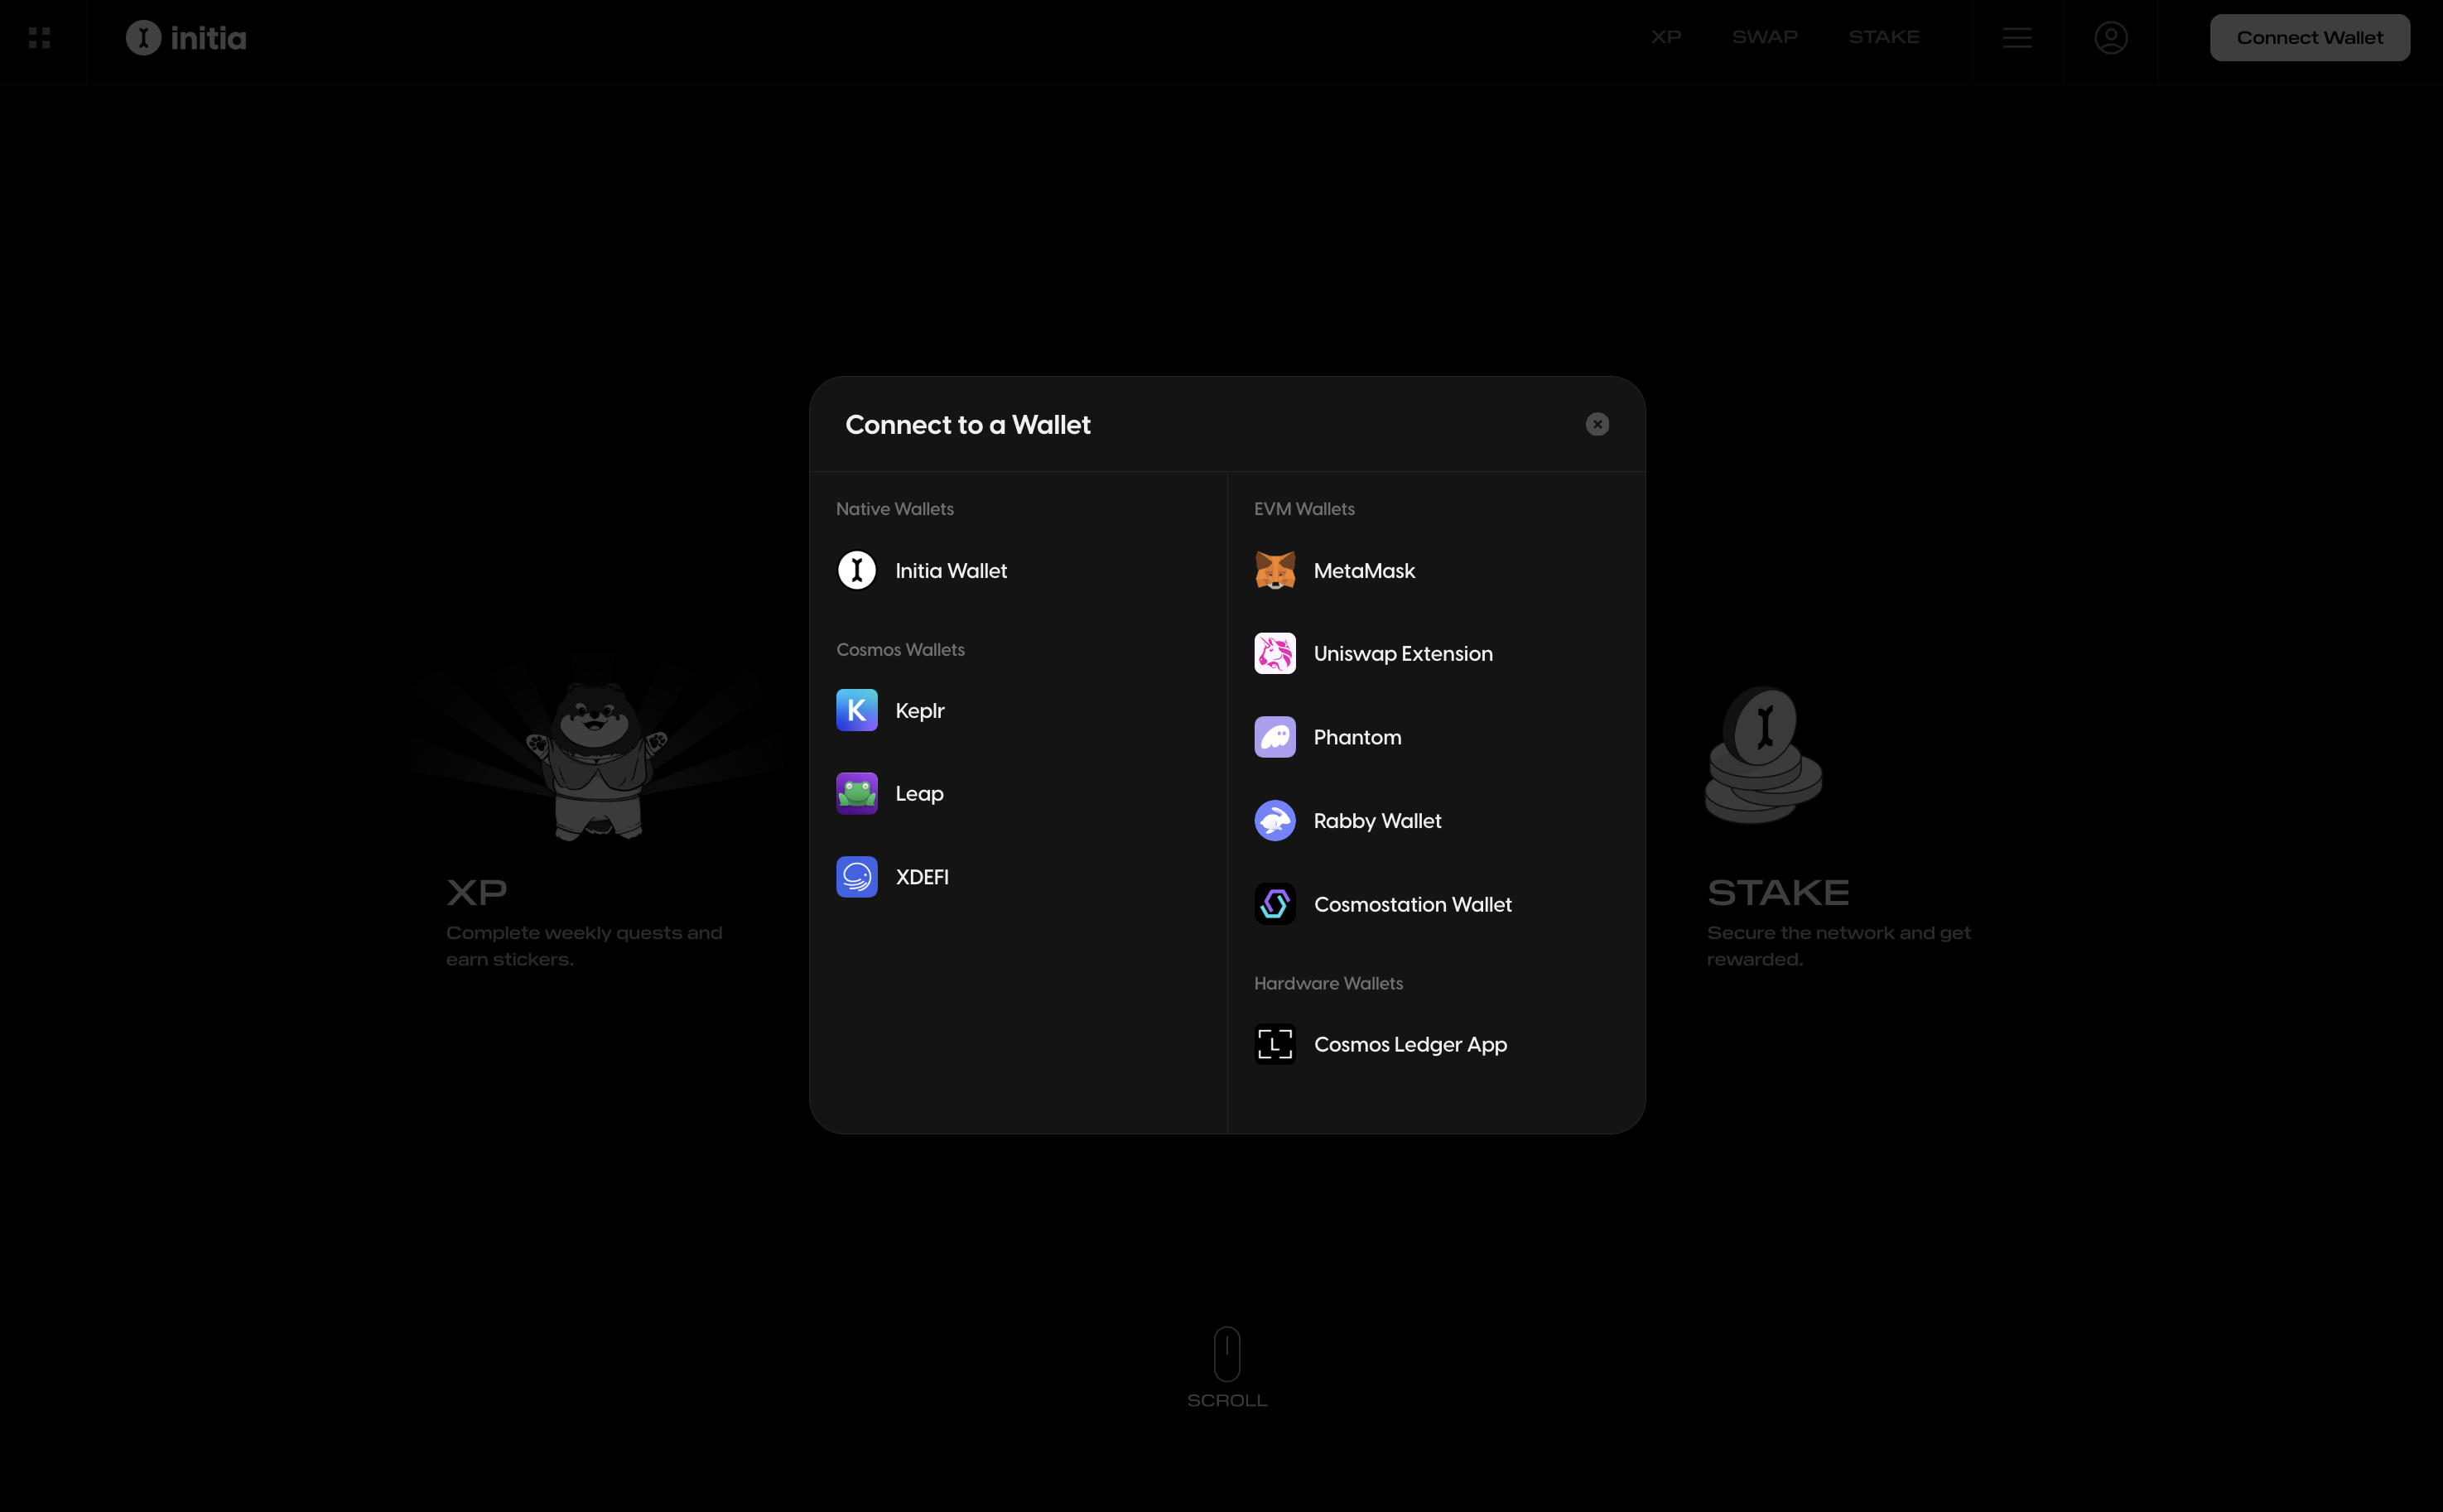
For this example, let’s assume you want to use Rabby. You’d select Rabby Wallet from the options, and…that’s it. You’re connected! On the backend, the Widget retrieves the necessary account information from the Rabby Wallet (e.g., address, public key, etc.) and creates the states required for it. During this, the Widget also uses your hex (0x…) address to derive your init-prefixed bech32 address.
Now that you’re connected, let’s see how interacting with the app and broadcasting transactions work. Say you want to stake 1 INIT to a validator. For the sake of simplicity, let’s say you’ve already funded your address with some tokens.
You’d go to the “Stake” page, select “INIT” as the token, enter “1” as the amount, choose your validator, and click “Confirm” and “Approve” on the modal. At this point, you’ll see a Rabby pop-up with the transaction.
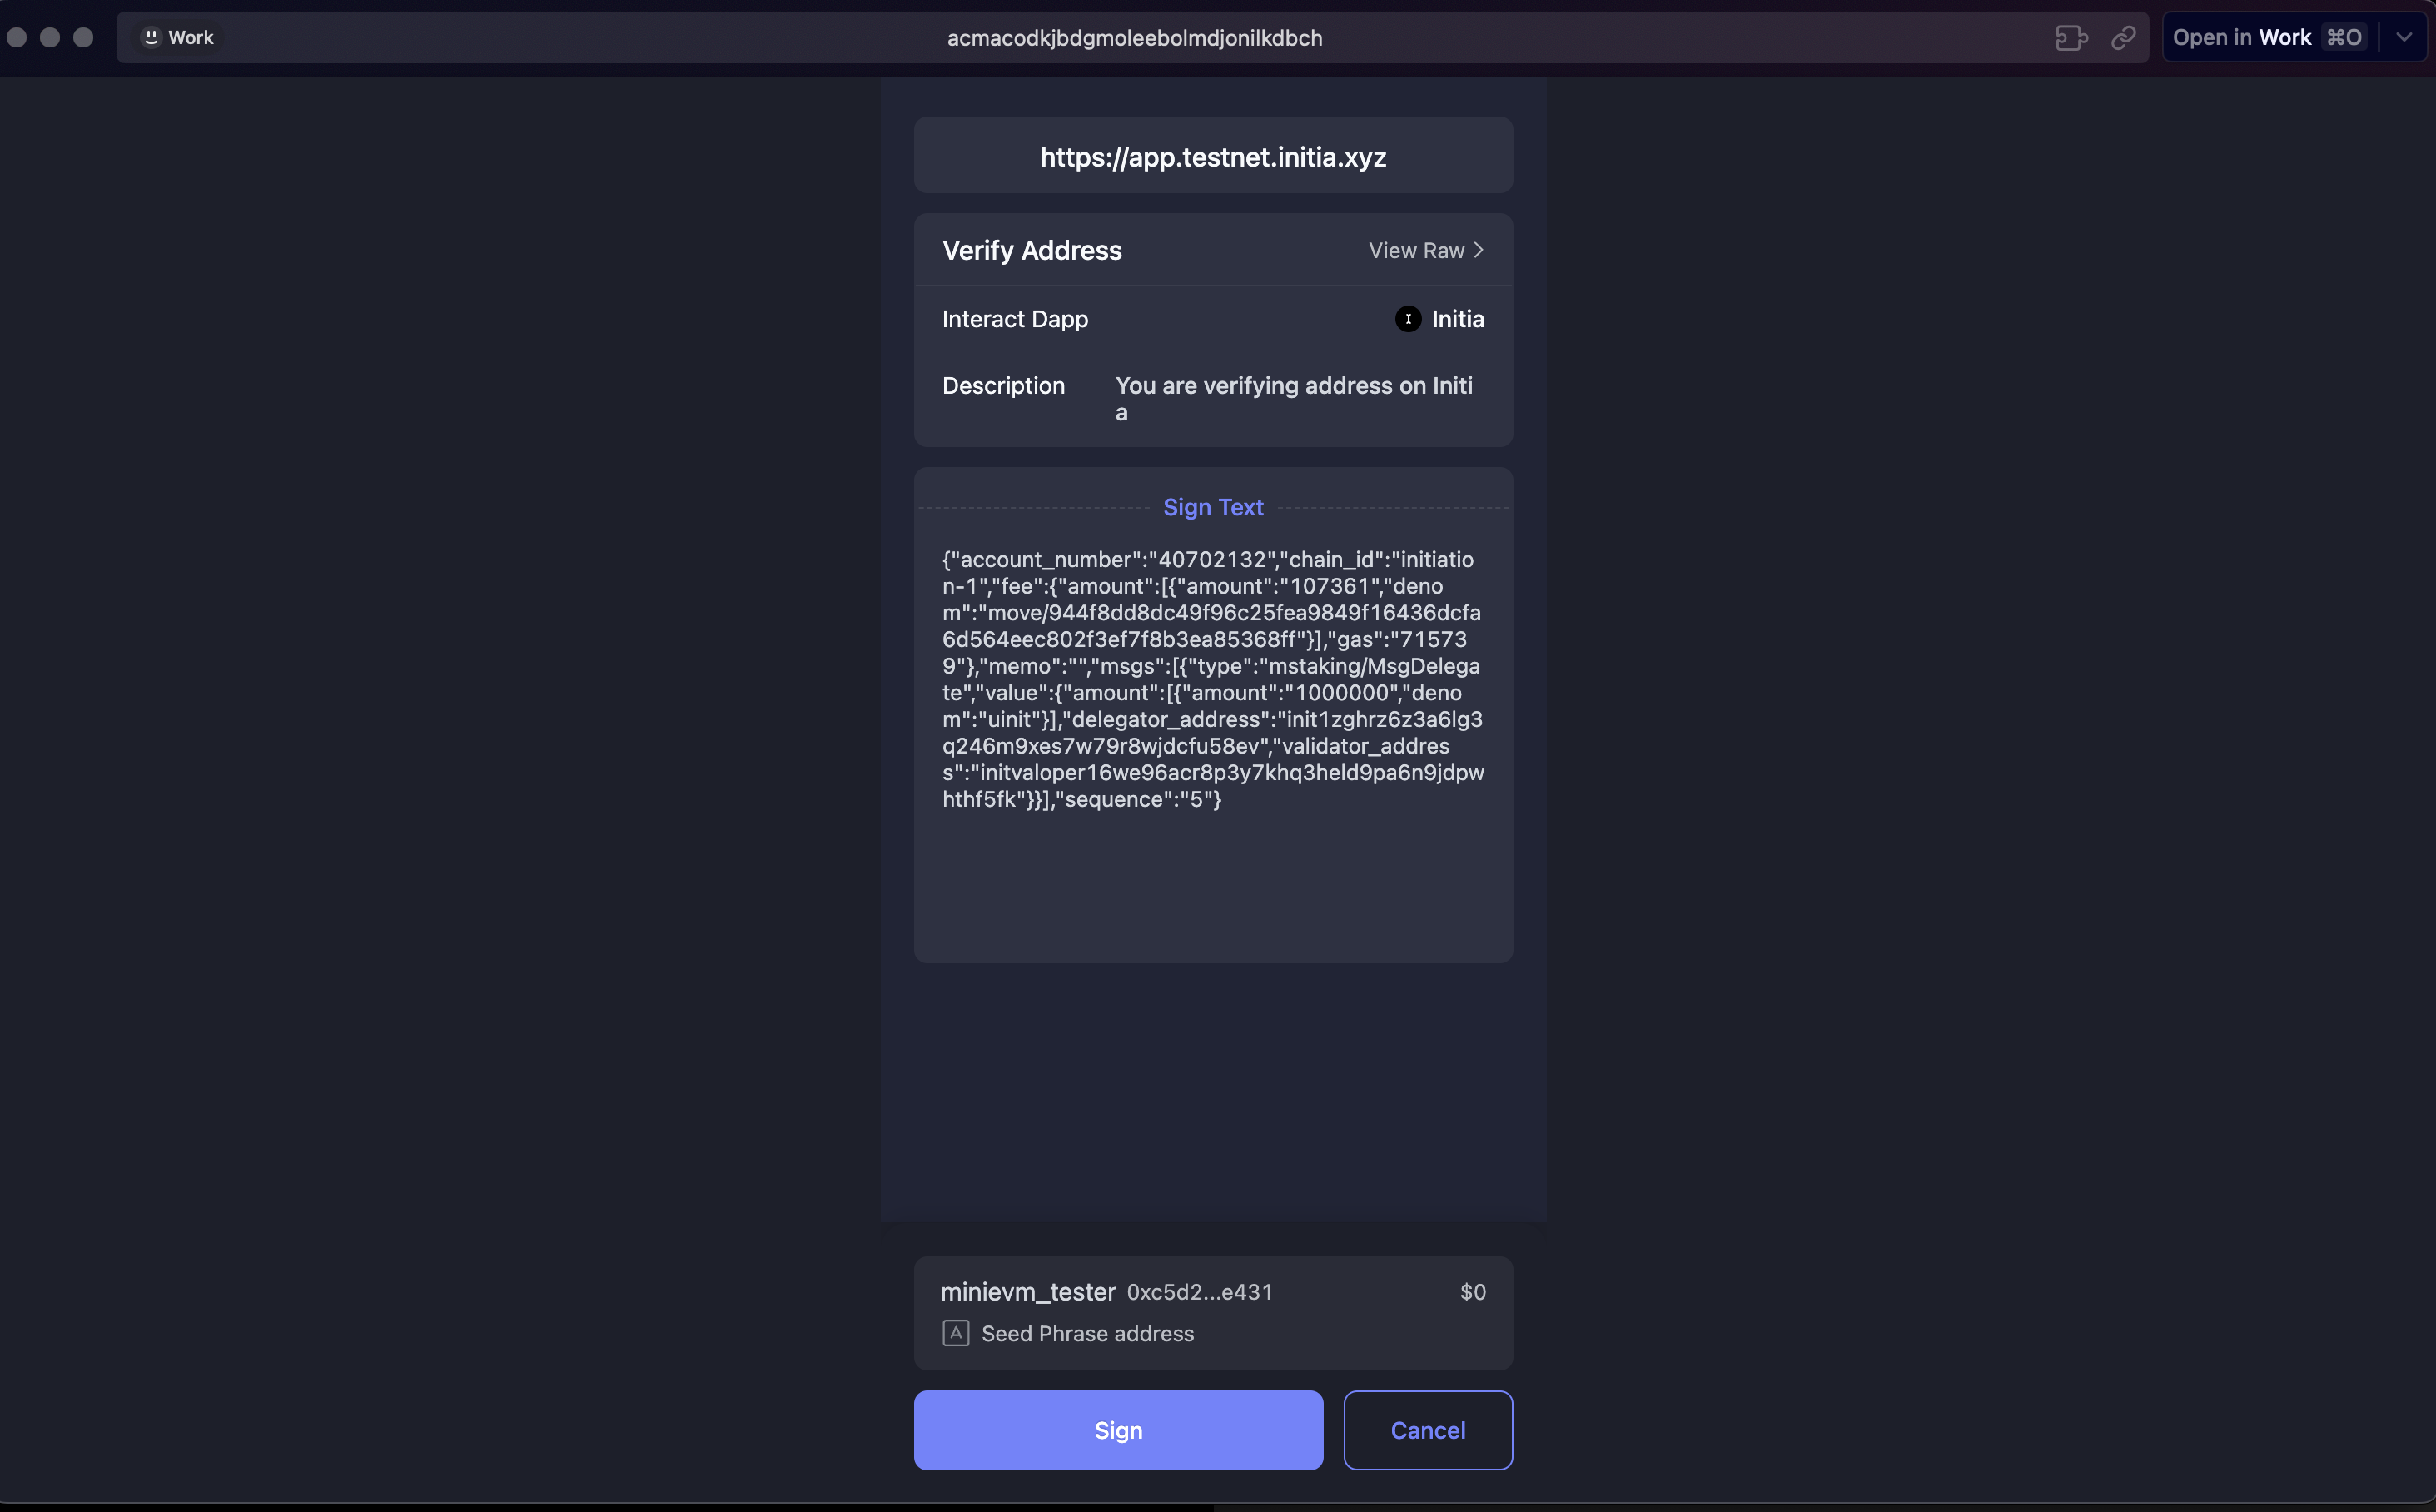
But if you look closely, you might notice notice two things:
- the wallet is asking you to only sign a message, not actually broadcast the transaction
- you’ve never actually needed to add the Initia network or switch to it on your wallet
How is this possible?
The Secret Sauce
As mentioned before, the Widget is using the connected wallet solely as a signing device. It is offloading the function of broadcasting the transaction from the wallet to itself. And since the private key you’re using to sign the message is the same across all chains, the network the wallet is currently connected to doesn’t matter.
The Widget handles all the tasks necessary to make that possible. But what are these tasks?
Digging Deeper
To accomplish its feat, the Widget performs multiple steps, as illustrated in the following sequence diagram:
sequenceDiagram
 participant User
 participant Website/App
 participant Widget
 participant MetaMask
 participant Initia Network

 User->>Website/App: Initiate transaction
 Website/App->>Website/App: Create transaction messages
 Website/App->>Widget: Request transaction (txBodyValue)
 Widget->>Widget: Setup signer
 Widget->>Widget: Create Cosmos SDK transaction
 Widget->>MetaMask: Request to sign transaction
 MetaMask->>User: Prompt to sign transaction
 User->>MetaMask: Approve signature
 MetaMask->>Widget: Return signed transaction
 Widget->>Widget: Convert signature to Initia-compatible format
 Widget->>Initia Network: Broadcast signed transaction
 Initia Network->>Widget: Confirm transaction
 Widget->>Website/App: Return transaction result
 Website/App->>User: Display transaction result
For those looking for a TL;DR, the Widget:
- receives the transaction data from the application
- passes the transaction data to the connected wallet for signing
- converts the EVM signature to the Cosmos SDK compatible format
- broadcasts the transaction to the network
- returns the transaction results to the application
But for others, let’s break down each step in more detail. For the sake of example, let’s say you’re trying to send 1 INIT to another address on Initia.
1. Transaction Request
When a user initiates the token transfer transaction on an application, the app sends the necessary transaction details to the Widget using the requestTx function. This includes the transaction payload and other options like chain ID and gas configurations.
2. Signer Setup
Inside requestTx, the Widget first sets up the signer by validating the transaction data and ensuring the specified chain is added. It also verifies that a wallet is connected and an authenticated signer account is available.
This signer class is extremely important. It defines the specific logic of how to sign transactions for each wallet type, and is the main way in which the Widget accomplishes the remaining step. For this example, we wil be using the EthereumSigner variant, meant for EVM wallets.
3. Transaction Handling
Once the signer is set up, the Widget prepares, signs, and broadcasts the user’s transaction.
This step begins with the Widget preparing the transaction data and sending it to the connected wallet for user approval. The signTx function inside the signer we just created handles this by creating a signDoc object that represents the raw Cosmos SDK transaction data.
async signTx({ messages, memo = "" }: TxBodyValue, fee: StdFee): Promise<TxRaw> {
  //...
 const aminoMessages = messages.map((msg) => this.aminoTypes.toAmino(msg))
 const { address, pubkey } = await this.getAccount()
 const account = await signingClient.getAccount(address)
  if (!account) throw new Error("Account not found")
 const { accountNumber, sequence } = account
 const signDoc = makeSignDoc(aminoMessages, fee, this.chain.chain_id, memo, accountNumber, sequence)

  assertDefined(this.offlineSigner)
 const { signature } = await this.offlineSigner.signAmino(address, signDoc)
  //...
}
In the last line of the above snippet, the signDoc option is passed into signAmino for signing. This is where the magic begins. The personalSign function inside signAmino contains a line that triggers the EVM wallet’s signMessage function. When that line is reached, the Widget sends a request to the wallet to prompt the user to sign a message that contains the transaction data.
async personalSign(message: string | Uint8Array): Promise<string> {
 try {
    //...
    const provider = new ethers.BrowserProvider(this.provider)
    const signer = await provider.getSigner()
    return await signer.signMessage(message) // triggers a pop-up for user to sign message
 } catch (error) {
    if (isError(error, "ACTION_REJECTED")) throw new Error(error.shortMessage)
 throw error
  }
}
However, EVM signature format is incompatible with Cosmos SDK (and by extension Initia) transactions by default. So, for the Widget to be able to use the signature to build the complete transaction, the signature must first be converted. The snippet below shows the conversion process.
private async sign(signDoc: StdSignDoc): Promise<StdSignature> {
  //...
 const signatureFromHex = fromHex(signatureHex.replace("0x", "")).subarray(0, -1)
 const secp256signature = Secp256k1Signature.fromFixedLength(signatureFromHex)
 const signatureBytes = secp256signature.toFixedLength()
 return encodeSecp256k1Signature(compressedPublicKey, signatureBytes)
}
If we were to visualize the conversion, it would look like this:
flowchart LR
    A[Start: EVM Signature] --> B[Remove '0x' prefix]
    B --> C[Convert hex to bytes]
    C --> D[Remove last byte]
    D --> E[Create Secp256k1Signature]
    E --> F[Convert to fixed length]
    F --> G[Encode with compressed public key]
    G --> H[End: Cosmos SDK Compatible Signature]

    style A fill:#f9f,stroke:#333,stroke-width:2px
    style H fill:#9ff,stroke:#333,stroke-width:2px
And while this conversion process is similar across all wallet types, the specific steps vary depending on the wallet’s default signature format.
4. Transaction Broadcasting
After the signing and signature conversion, the Widget creates the final Cosmos SDK transaction and broadcasts it to the network. The transaction object is created by combining the signature, transaction data above, and other necessary fields to create a the final TxRaw transaction object. That object is then finally broadcasted to the network using the broadcastTx. Once the transaction is included in a block, the Widget returns the transaction results to the application, displaying the outcome to the user.
5. Transaction Confirmation
Once the transaction is included in a block, the Widget returns the transaction results to the application and displays the outcome to the user.
Leveraging the Widget’s capabilities enables seamless interaction with the Initia network using any compatible wallet. This approach simplifies the transaction process, making it more accessible for users across different blockchain ecosystems.
Conclusion
From the above, it’s pretty clear how the Widget solves a major pain point for users coming into Initia from other chains and ecosystems. By providing a single intermediary that handles all the wallet and network-specific logic, we’ve unlocked a significantly more seamless and user-friendly experience.
But the Initia Wallet Widget isn’t just for users coming from other chains and ecosystems. It’s also for users who don’t have any wallets yet. To serve those users, the Widget also comes with two solutions:
- Initia Wallet
- Social Login
For those open to using wallets, we’ve designed the Initia Wallet to offer the best and most native experience when interacting with chains within the Initia ecosystem. For users who don’t want to use wallets at all, the social login feature allows them to sign in to their Google Account, and a new wallet is automatically created for them. We will explore both of these options in more detail in future articles.